Tips
100% Working Tweaks and Tricks to Maximize uTorrent Download Speed [Ultimate Settings Guide]
Bittorrent is a very fast way to share data on internet, however you have to configure your bittorrent client the right way to achieve the maximum download speeds. In this article, you’ll get to learn some tweaks and tricks to speed up your bittorrent client downloading. This article explains how to set utorrent efficiently to optimize download speed and other ways to speed up utorrent and increase utorrent download speed.
The tweaks below are performed on uTorrent, which you can download from http://www.utorrent.com/downloads. Don’t worry If you have any other bittorrent client, you can still find the similar options if you browse the preferences of your client.
There are so many randoms tricks & tweaks available on internet which are confusing and most of the users get confused which one to read and follow. We’ve read almost all those tweaks and applied and tested on our system to see which one is working. We compared the test results on different system and found some of them are always working on any type of internet connection. So instead of putting all those randomly we are breaking it down to some easy steps to follow.
Step 1 : Testing Your Internet Speed
Now first of all, you need to know your ISP’s download and upload speed. Visit http://www.speedtest.net. Run the test by clicking the yellow pyramid on the map. This will run the speed test with the closest server near your location.
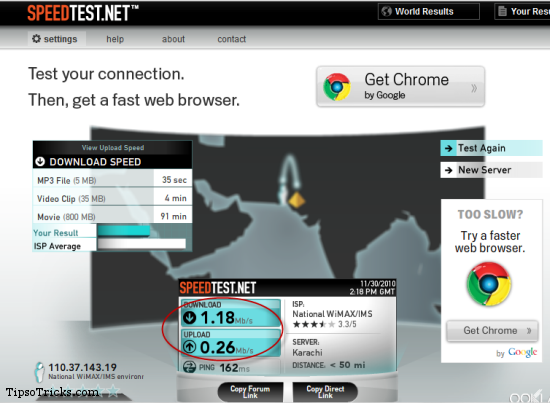
Allow it to run the test for few seconds. After it’s done note down the download and upload speed. We’ll need it later to set up in uTorrent.
Step 2 : Setting up Speed Limits in uTorrent
1. Open uTorrent, Press Ctrl+P (to open preferences).
2. From left column, choose “Bandwidth”
3. On right pane, under “Global Upload Rate Limiting“, set the value lower than your upload speed you noticed in Step 1. Like if you have 1Mbps of upload speed then you should set the upload limit something lower than that, like 800-900kbps. Like in the screenshot in step 1 it’s showing 0.26Mbps (or 266kbps) of upload speed then in uTorrent it should be set to something below this speed, like 240-250kbps.
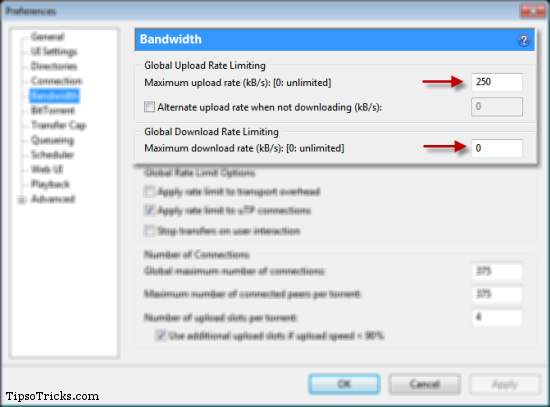
4. But for the “Global Download Rate Limiting“, it should be set to Unlimited. Set it to 0 (which means unlimited), to experience the maximum speed. However you can set a limit if you’re parallely downloading something else and want to save bandwidth for that process too.
Step 3 : Port Forwarding
Port forwarding is another important aspect you need to keep in mind to gain maximum download speed. Port forwarding means to dedicate a port address for downloading any data without interruption. In this case we are dedicated a port for bittorrent downloads. To test if a port is forwarded for your system, see this article to learn about port forwarding and setting it up for your uTorrent client:
Increase Torrent Download Speed- The Easy Way!
If you can’t find any port for your system, it’s still fine and you can download with good speed until the green tick mark is shown in uTorrent status bar in right bottom. If it’s yellow or red, there’s a problem with your internet connection or configuration that you need to look. This usually happens due to firewall blockage, which is found to be the biggest cause of low download speed.
Step 4 : Checking Windows Firewall Settings
The most common mistake users do is they never check whether their bittorrent client is allowed to connect to internet. If you’re using default windows firewall then there’s no need to worry about as uTorrent set an exception automatically when it’s installed. But if there’s a third party firewall program or internet security suite installed then check its firewall settings and allowed programs list to see if uTorrent is added in the white list or Exception lists.
Step 5 : Configuring Basic Settings
These are the main tweaking steps which can result in a noticeable increase in speed. For some people only few of these could work, but you can perform all the tweaks below to see the maximum speed possible. It is possible that your bittorrent client settings are already configured at optimal settings. So it is strongly recommended to check the download speed after performing each tweak. You never know if a wrong configuration slows down the speed instead of increasing. In this way you can easily undo the step If you experience slower speed than usual.
Here are the random tweaks you can perform. After each tweak resume the downloading and observe the download speed for atleast 5 mins to see how it’s performing.
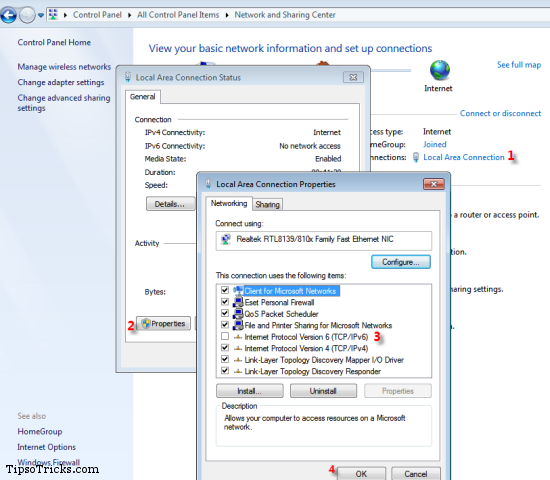
- In Windows, Goto Network & Sharing Center, Open Local Area Connection Status > open the Properties > and uncheck “Internet Protocol Version 6 (TCP /IPv6)” and save the settings.
- Open uTorrent’s preferences (Ctrl+P). On left column choose “Bittorrent” and from right pane, set “Protocol Encryption Outgoing” to FORCED and check mark the “Allow Incoming Legacy Connections“. This will make all your outgoing and incoming packets fully encrypted, except for tracker communications. Peers who are using a torrent software that doesn’t support encryption are dropped. Avoid doing this for torrents with low peers/seeds.
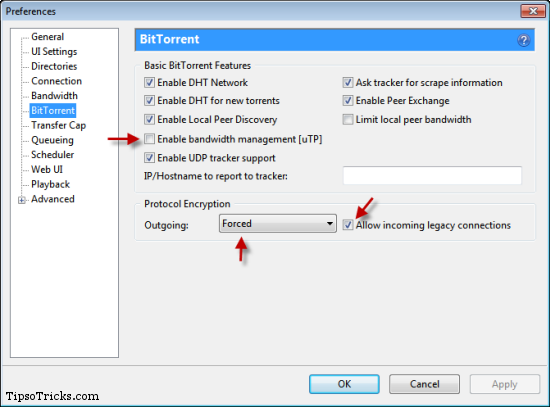
- Disable UTP by going to Options > Preferences > Bittorrent > Enable Bandwidth Management [uTP] > uncheck it.
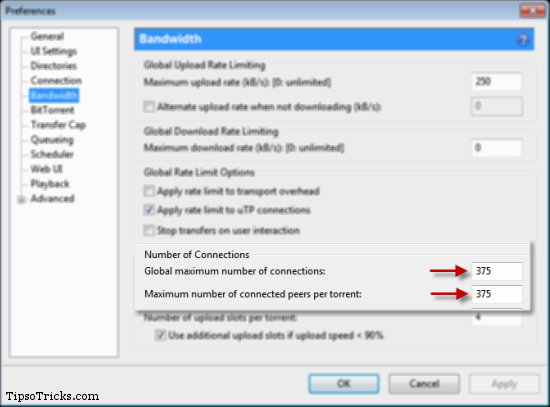
- If you’re downloading one torrent at a time. Set some higher number of connections in Options > Preferences > Bandwidth > Number of Connections. Like 300-400. If it’s slowing down the speed, lower it down in steps of 25 and experiment. Keep the number at minimum if multiple torrents are in the downloading list.
- If you have a proxy server such as a local ISP’s one, then set the Proxy server in Options > Preferences > Connection. Under ‘Proxy Server‘, select the Type as HTTP and specify your proxy and port. Check the box ‘Use proxy server for peer-to-peer connections“.
Step 6 : Tweaking Advanced Settings
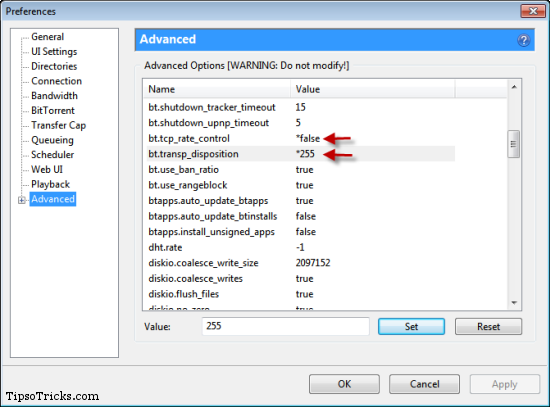
Now the settings below are advanced ones and usually it’s not recommended to change if your speed is fine. After applying above mentioned tweaks if you are unable to see any increase then you’re allowed to proceed to alter these advanced settings. These can be accessed by going to Preferences > Advanced.
Change:
peer.lazy_bitfield – to false
net.max_halfopen value to 50
bt.transp_disposition value to 255
bt.tcp_rate_control to false.
peer.disconnect_inactive_interval value to 300-600. (experiment with this)
Step 7 : Adding More Trackers
You can add more public tracker to get more seeds and peers.
- Open uTorrent and select the torrent by clicking on the torrent name from the list.
- Click on the General tab below.
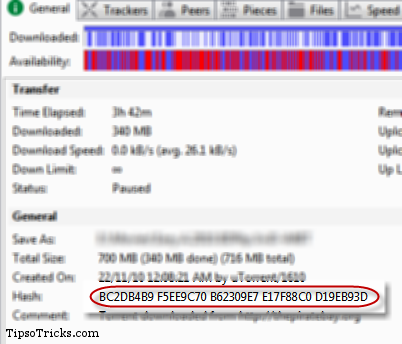
- There should be a field labeled Hash near to the bottom with a string of alphanumeric characters.
- Right-click the string and click Copy.
- Open Google.com and paste the value into the search box and hit enter.
- There should be a few result of particularly exact same torrent from all the torrent sites with this Hash tag.
- Download the torrent from all sites and open it in uTorrent. You will get a pop up box saying: “The torrent you’re trying to add is already in the list of torrents. Do you want to load the trackers from it?“
- Simply click “Yes” to add the trackers.
Now your torrent will get more seeds and peers resulting in more speed.
Step 8 : Testing Download Speed
Download any torrent with good amount of seeds and peers. Stop the downloading, change one setting at a time (explained in Step 5 and 6), resume downloading and observe for 5 minutes atleast to notice the speed and before applying any other tweaking. Again, do not make all the changing in one go!
If it’s still slow, try downloading a different torrent. A high ratio of seeds to leechers (Eg. 2000 seeds to 10 leechers) will make a big difference in speeds. And keep an eye on the status bar, make sure there is a green tick at the right bottom of status bar in uTorrent.
Hope this guide would help you in tweaking your bittorrent client to achieve maximum possible downloading speed. We’d love to know your feedback on this. Please add your tips or tricks in the comments below if you think we’ve missed any.

