Featured
Transfer Files Between Two Windows PC’s Without Any USB Device [Tutorial]

When transferring files from one computer to another, most people use a storage medium, such as a Flash drive or an external Hard Disk. While that may be the simplest way to transfer files, there is a lot that could go wrong. Your USB device might get corrupted, for example, resulting in the loss of data. Besides, it takes a lot of time to write onto that device and then read from it on another computer. It’s a very cumbersome method. Today, I’ll teach you to transfer files between two PC’s quickly, be they text documents or your backup files taking up hundreds of GBs worth of space.

It is always good to back up your data on another computer. Never keep all your eggs in the same basket, in case of a malware attack or a hard disk crash. After reading this post, you’ll know how to do it efficiently.
What you’ll need!
There are three ways to do this, You’ll need any one of the following:
- A cross-over Ethernet Cable – You normally find these with external modems and routers. Every PC has an Ethernet port. If you don’t have this cable, you can buy it. It comes really cheap or you can use other ways to connect your PCs, which we will talk about in detail, don’t worry.
- A WiFi connection – It’s a way, but not a necessary one. You can do without one. But of course, having a WiFi in your home can help.
- WiFi enabled computers – Your computers must have WiFi connecting capabilities. Otherwise, you’ll need an Ethernet cable. If you don’t have either of those, then perhaps USB drives are the option for you.
Note: This method will only work if one of the computers is running on Windows Vista/7.
It does not matter what OS (Operating System) you’re running, but it should be Windows. But since Windows Vista and 7 are the most popular, this tutorial will cover those OS.
Step 1: Setting up a connection
Before you can do anything else, to transfer files between two PC’s, you need to connect the PCs either physically, or with wireless t.
Using a cross-over Ethernet Cable
If you have a cross-over Ethernet cable, then plug each end into a computer. Now look in the task bar. You’ll see something like this, depending on your OS. For Ethernet transfer, it’ll be easier if you turn off your PC’s WiFi connection.
Click on the monitor icon in the task bar, and click on ‘Open Networking and sharing Center’

Next, click on Local Area Network as shown below.

Now, you’ll see many options. Open up the option that says ‘Internet Protocol Version 4 (TCP/IPv4).’ Do not meddle around with IPv6.

Next, you’ll see a bunch of fields and numbers. Look in the image below and copy down the numbers as they are. The circled field can hold any number between 0 and 255, but not the number that the Default Gateway has. IP address can never be the same as Default Gateway. You can leave the DNS fields as they are.
Make sure that the option ‘Use the following IP address’ is checked.

Important: You have now set up one computer. If the other computer is running on Windows7/Vista as well, then follow these steps again for that computer. Except this time, use a unique IP address, different than the one you assigned to your first computer. For example, if my Default Gateway is 192.168.1.1, and my first computer’s IP address is 192.168.1.2, then my second PC would have 192.168.1.3 or something like that.
Also, the Default Gateway should be the same for both computers.
Using an existing WiFi network To Transfer Files Between Multiple PC’s
If you don’t have an Ethernet cable, you can connect and transfer files between two PC’s through a common existing WiFi network. If you have an Ethernet cable and have done the above procedure, then skip to Stage 2: Sharing
To connect two PCs together through a WiFi network, first connect both to that network. The steps are much the same as they are with Ethernet. There are a few minor changes. First, instead of the monitor icon in your task bar you’ll have to click on the Wireless icon.
Creating a new wireless network
If you have an Ethernet cable or an existing WiFi network, then you can skip ahead to Stage 2. Otherwise, you need to create a new wireless network. Open up Networking and Sharing Center as shown above. There, you’ll see an option to ‘Set up a new Connection or Network.’
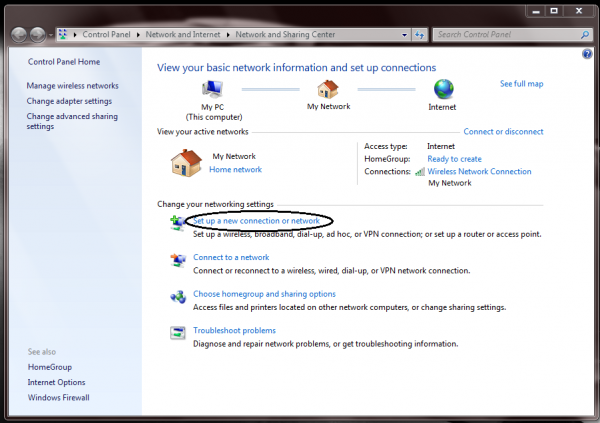
Scroll down on the dialogue box that appears and select ‘Set up a wireless ad-hoc network’
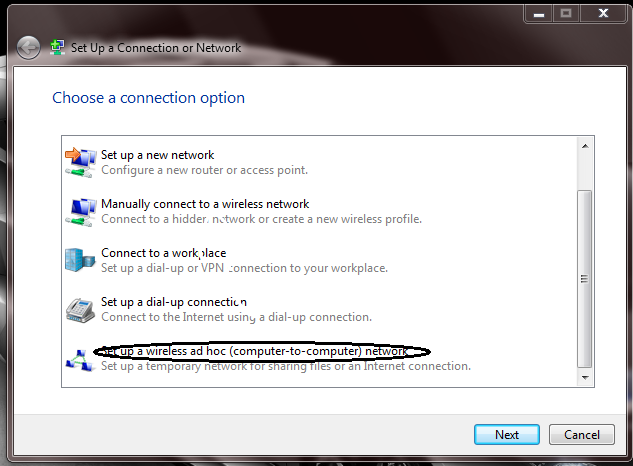
You will then be guided through an easy set up. choose a password for your network if you want. This network will be accessible to other computers just as a WiFi network would be. They can connect to it. After connecting, follow the steps for connecting PCs through an existing wireless network.
Step 2: Sharing files
Sharing files is really simple. You can’t share files directly, but you can share the folders they are located in. Here’s how to share files on Windows 7.
Right click on a folder and then the “Share With” option. Choose Specify People.
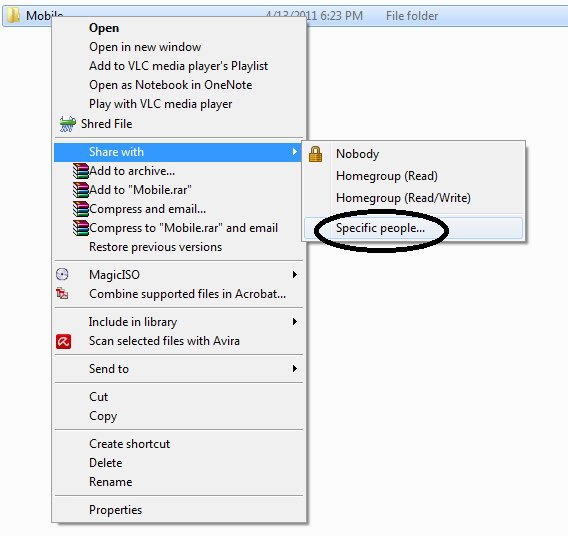
You’ll now see a dialogue box appear. Click on the pull down menu to see who you can share with. Here, you can share your file with anyone. But for now, just click on ‘Everyone’.
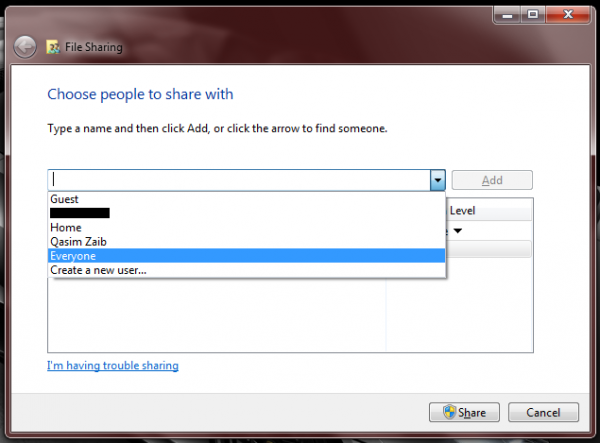
And that’s it!
Step 3: Copying files
This is the easiest step of all! To access the shared files, simply press the Window Key + R. Now, type in two back-slashes (\\), followed by the IP address of the other computer you want to read files from. Let’s say my PC 1 has the IP 192.168.1.2, and my PC 2 has the IP 192.168.1.3. If I want to transfer a file from PC 1 to PC 2, then I’ll click run on PC 2, and then type the IP address of PC 1.

Press enter, and voila! You’ll see all the files and folders the other PC has shared! Simply copy and paste them on your other PC, and you’re finally done!
Be advised that wireless file transfer is slow. If you want to transmit GBs of data, then I’d recommend you get an Ethernet wire. Ethernet is really fast! It can transfer a GB of data within seconds.
That concludes our tutorial. Hope you liked it. If you have questions, feel free to ask! 🙂


