Development
Inserting Adsense ads inside Blogger Blog Posts

Using simple layout page, you can place these ads anywhere in your blogger blog, like in the sidebar, before posts, below posts even between the posts, but by using any gadget, you can’t place them INSIDE any post. There’s no gadget available to place adsense ads inside the posts. So, to Place adsense ads inside a blogger post, you have to modify the template a little bit to place the adsense code in there.
And if you dont know, then let me tell you that CTR of the ads inside the blog posts is much more higher than the ads outside posts.
There are dozens of articles explaining this method of placing ads, but most of them are either poorly explained or without any screenshot. But here I’ll try to keep the procedure as simple as possible.
So, here it is: 1. Get your adsense code, and Encode it before placing. 2. Now, go to Layout section and “Edit HTML” tab.
3. Its always recommended to download a backup of your template before making some changes. So download the template!
4. Click “Expand Widget Template” checkbox.
5. Press “Ctrl+F” and find: 6. Now Copy the code below and paste it just ABOVE the tag you searched in step 5.
…Don’t forget to replace the text in red with your encoded adsense ad code, that you have done in step 1. DONE! After doing this step, An adsense ad will be placed just below the title and above the text of EACH and EVERY post of your Blogger blog automatically.
Now if you want to place another ad inside posts, but below the text of the post..You can search fo the same tag of step 5. This will place another adsense ad below the text of all the posts of your blog automatically.
Now you have 2 adsense units INSIDE your blog posts. One Just below the titles/above the text and second at the end of the posts’ text. 🙂
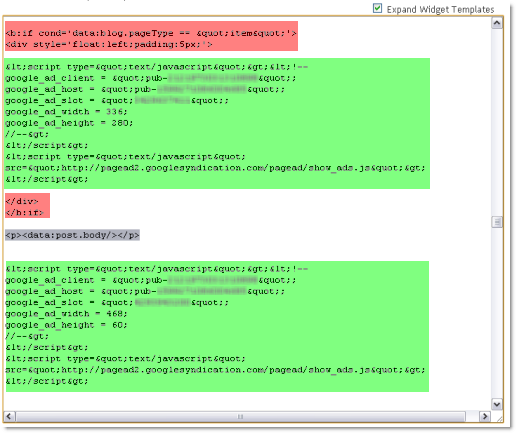
Your code should look like this after placing the ads code. The highlighted gray area is the tag that you have to search. You can change the placement and alignments of these ads within the post.
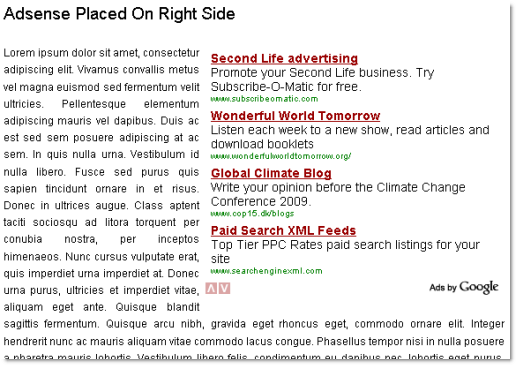
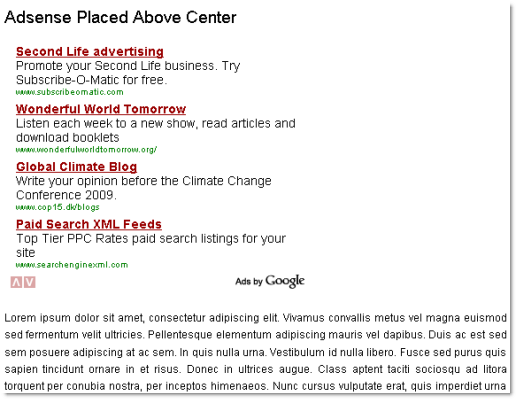
Just change the “center” (in blue) in step 6, to “right” or “left”, to change the ad’s alignments respectively. See these screenshots, to understand the alignments.
You can also place the ads side by side inside the post. And after that, make one ad to float “left” and the other one to float “right”. 🙂
You can place maximum 3 adsense units on a page as per Google’s Terms. If you are placing 2 inside the post, then you can place only one outside the post. Hope you have got the simple procedure. Instead of viewing your blog after saving changes in the template after each step. Use “Preview” feature for quick views. While the preview window is loading, quickly click any post title as soon as you see any. This will open that post in the preview window, and clicking will also be enabled. You can then see the changes you’ve made! 😉
WHY TO PLACE ADS INSIDE POSTS?
INSTALLATION
To do the encoding, you can use “Postable” or use other sites given here.
<data:post.body/>
If you are using “Expandable Post Summaries” in your template, then you’ll find <p><data:post.body/></p> and infact two of them.
In that case, you are supposed to place the adsense code above the first
<p><data:post.body/></p>
<b:if cond='data:blog.pageType == "item"'>
<div style='float:center;padding:5px;'>
--- PLACE YOUR ENCODED ADSENSE CODE HERE ---
</div>
</b:if>
These <b:if> and <div>tags will decide the alignment of your ad. So dont leave these while pasting the adsense code.
PLACING ANOTHER AD INSIDE POSTS
But this time place the code (of step 6) BELOW it.

Highlighted green area is the (encoded) adsense code.
Highlighted red are the <b:if> and <div> tags that assign the alignment of the ads. I highlighted them, just to make the picture clear and easy to understand.
(Don’t leave these tags while copying from step 6!!)
CUSTOMIZATIONS:
ALIGNMENT
PLACEMENT
To do this, you have to place both the ads, either ABOVE or BELOW
<p><data:post.body/></p>
Remember:
Like I placed, 1 in side bar, 1 inside the posts (just below titles) and remaining 1 below posts and just above “Related post”. 😉
Tip:
Although clicking is not enabled in preview window, but there’s a little trick, to enable clicking in preview…


