Desktop Tools
Increase Torrent Download Speed- The Easy Way!

Movies, Songs, Videos, Games, Software.. almost everything is available in a “torrent shell”!
Almost all of us download torrent frequently, and there would be very few among us, who don’t do torrent downloading or don’t know about torrents! :p
If you have a DSL internet connection and download torrents frequently and not satisfied with the download speed, then this little trick is definitely for you! No doubt that download speeds will totally rely on your connection speed! Remember: This tricks works only on DSL broadband internet subscribers.
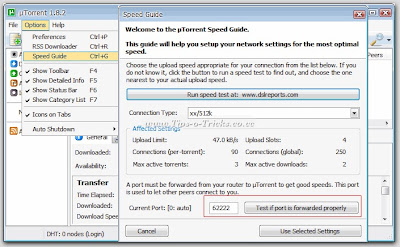
OK, here we go,Just follow the steps: 1. Open uTorrent, and check what port is uTorrent using currently. Now go to Options>Speed Guide or Press (Ctrl+G) to open Speed Guide window, which shows you the port currently being used by uTorrent.
This will open your internet browser’s windows, showing whether this port is open or not. 4. Repeat the Process with unique port numbers until a working and open port is found!!
[If you found this method bit slow and tiring, you can download a tiny utility “Port Checker” From HERE that checks ports that are open for your IP] 5.After successful port hunting, Note down the Port Number that works for you.
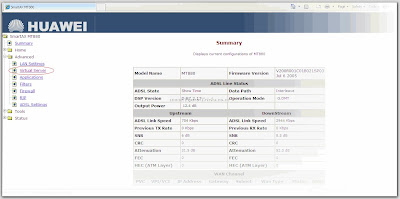
6. Now, Open your Internet browser, enter your (DSL) server’s IP. 7. Enter username/password. By Default a username and password is already associated with your device. [Here I am using “HUAWEI MT880” Router, and “admin” is the default username and password for this.]
8. From the settings page that opens, Choose “Virtual Server” from Advance Settings Collapsible panel. (Note: This settings page may look different on your device, so you’ll have to find these settings yourself using a little bit of your brain! :p) You may find this settings as, “Port Forward”, “Port Mapping”, “Port Mapping Set/Settings”, “NAT/DMZ”, “Routing”, “Port Range Forward” and names similar to these….
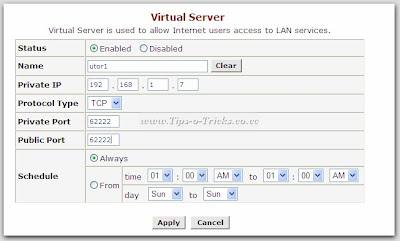
9. Now start filling some fields on the “Virtual server” page;
In Name field; Give any Name you like. In Private IP, give your system’s IP.
Leave <
i>Protocol Type to TCP. Now this is the trick we’ve been talking about! Type in the same port number that was approved open by uTorrent. Leave Schedule to default.
10. Save the settings and you’re done!! 😀
Now Go and download some torrent and see the difference in speed !! Get back to me if you face any kind of problem.
Happy Downloading! 😀
Which would increase torrent download speed noticeably.
What we are doing in here is trying to create a “Virtual Server” with our internet connection, which reserves a unique port with our IP.
Thus giving no chance to our torrent client to share resources elsewhere, and it can concentrate only on the downloading through the unique port which we have defined, giving the as maximum download speed possible.
It doesn’t mean after doing this little tweaking, torrent downloads, even on slower DSL connections will give as fast downloading as on faster DSL connections. :p
But before that First go to Options>Preferences>Connection settings or simply press (Ctrl+P) and uncheck “Enable UPnP Port Mapping” check box if checked.
and Click OK.
2. On that Speed Guide window, Click “Test if Port is forwarded properly” button.
If it is open, an OK Message is shown.
Otherwise an error will be shown.
3. If Port is not open,
…go to “Speed Guide” Option again, and change the port number.
Type any unique 5-digit port number you like. (Max. 65535)
…and Click “Test if Port is forwarded properly” button again.
(Usually 192.168.1.1 is the default)
It’ll ask for an username/password for this secured HTTP server.
That’ll open your DSL device settings main page.
(If you dont know this username/password, ask your serivce technical support for this.)
In most of the cases, username is “Admin” and password is either “Password” or “admin“

Leave Status setting default.
That is Enabled.
Like I gave “utor”. You can write anything, It doesn’t matter!
….Port Forwarding!! 😉
In both Private Port & Public Port.


