Blogging
How to Move from Blogger to WordPress in Just 6 Steps [Ultimate Guide]
Setting up a blog at Blogger.com looks much easier and convenient to new bloggers at beginning. The biggest reason for that is it’s FREE and extremely easy to learn and blog. I too started with blogger and had no idea about self-hosted wordpress blogs at that time.I thought blogger.com would be well enough to handle all of my blogging needs.
However as my site grew up I realized I need more more control over it, more of that “professional touch” to attract more and more visitors and readers. And Blogger.com is simply not up to the challenge of running a professional blog. As I observed that almost all of those professionals out there are running their blogs on WordPress platform, I started learning more about it and decided to make the “big MOVE” – shifting from blogger to WordPress.

Why? Well there are hundreds of answer to this. With WordPress you not only get your own hosted server but also get rid of the limitations by Blogger.com. The two BIG reasons behind moving to WP are (1). Plugins Support and (2). Better SEO. These are just 2 reasons, but I found many good reasons that make WP way better than Blogger.com.
Read : 11 Reasons Why a Self-hosted WordPress Blog is Better than a Blogger Blog
But the biggest risk or you can say the giant question mark was there. How to move from blogger to wordpress without losing my precious Page Rank and Alexa ranking? Will I completely lose my Site’s rankings? incoming traffic? and all other incoming links? This was boggling in my mind until I finally made the move successfully.
And as I promised, I’m here with the guide that will make the Blogger to WordPress migration look so easy that I’m sure you’ll be convinced after reading this. So here is the Ultimate guide on How to migrate from Blogger to WordPress.
I’ve put my level best to keep the tutorial as easy as possible and for that reason I broke it down to 6 simple steps just to make it look more comfortable. I’m pretty confident that this would be the EASIEST tutorial of all you’ll find on web. Why? Because I had read almost all the tutorials available on net and successfully migrated two of my blogger blogs without losing anything!
But first, there are two most important and obvious things that are required before we start with the 6-Steps Migration procedure:
1. Web Hosting
To start a self-hosted WP blog, you require a web hosting to install WP and to host your blog posts and images. So it is assumed here that you’ve already purchased a hosting space. If you haven’t, then its time to spend some money now. 🙂
I’d highly recommend iPage as a reliable web host, not because it’s among Top 3 web hosting providers of all, but with it you get so many new and advanced features that other web hosts lack. You get an advanced, user friendly, all-in-one cPanel to control all your server’s settings and offcourse the “One-click WP install” feature so you never have to go through that manual WP installation.
I’m not recommending iPage just because TipsoTricks is also hosted by iPage but with only $3.50/month it’s a really attractive deal to consider. You get unlimited storage, unlimited bandwidth, unlimited databases and domains to host. But in the end final decision will be yours offcourse. So do some homework and research properly before choosing your web host.
2. Domain Name
If you’re already using a custom domain (like http://www.mysite.com) on your blogger then it’s all fine because we’re going to use the same name to set on your new WP blog offcourse. But if your blogger/blogspot blog’s URL is http://yourblogname.blogspot.com you have to have a domain name. Since you’re going to self-host your blog now, you need a name to call it and you can’t use your existing http://xxxx.blogspot.com to name your WP blog.
Well don’t worry, your web hosting comes with a FREE domain included in the package so you don’t have to purchase it separately. Again iPage comes with FREE domain name no matter what hosting package you choose.
So if you’re now all set with your hosting and domain name at this point, then here we go with the actual migration steps:
1. Change Name Servers of Your Domain
If your blogger blog has default URL like (http://xxx.blogstpot.com) then it’s absolutely fine because I assume at this point you’ve purchased the hosting with a domain name. So there’s no need to read this first step.
But if you have a custom domain (mysite.com) already set on your blogger blog, then you need to redirect it to your new hosting provider’s nameservers by changing setting through your Domain Provider’s Control Panel. To do this Login to your existing Domain Manager’s Account, Look for “Name Server”, remove all the nameservers currently set there and put the nameserver as provided by your Hosting Provider.
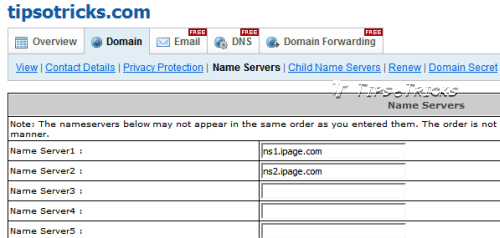
A NameServer’s address looks something like this:
ns1.XXXXXX.com
ns2.XXXXXX.com
Where XXXXXX is usually the domain name of hosting provider itself. Like if you choose iPage for your hosting, it’s nameserver addresses are:
ns1.ipage.com
ns2.ipage.com
Remove all other settings like, ANAME, CNAME (if already created) from your Domain Settings Panel.
Remember: Changing NameServers may take several hours for proper configuration. It may take from 5-24 hours or sometimes more than 24 hours before your domain properly starts pointing to your new NameServers. In my case it took only 4 hours to configure but time this varies with different domain providers.
2. Install WordPress on Your New Server
Well this is the easy part. Most of the web hosting services provides Auto install scripts like “Simple Scripts” or “Fantastico”. You can find any of these on your main cPanel of your web host.

Just click on it and follow the on-screen instructions to setup WordPress.
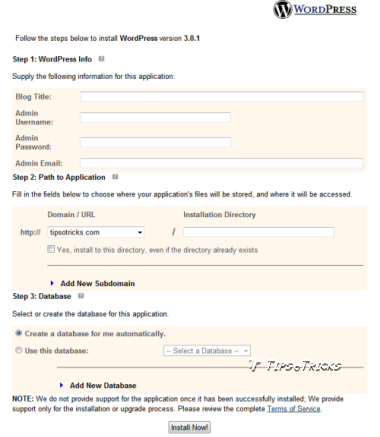
All you need to do is put in the site’s name, enter admin details and click Install, to see your new WP blog. As easy as it sounds!
Note: You still may not be able to login into WP admin panel, if your domain (that you set in Step 1) is not properly configured to current web host’s NameServers. If you can’t see WP admin panel then wait until Domain is completely configured with your web host Name Servers.
3. Switch Blogger Blog Back to .blogspot.com Domain
Now this is something REALLY IMPORTANT. Be very careful at this step.
Login to your blogger blog and go to “Settings” tab. Take Backup of your whole blog (just to be on safe side). Now if your using blogger blog’s default URL (http://yourblogname.blogspot.com) then ignore this step completely and jump to Step # 4.
Otherwise, if you are using custom domain, then switch the URL back to the default one (http://xxxx.blogspot.com).
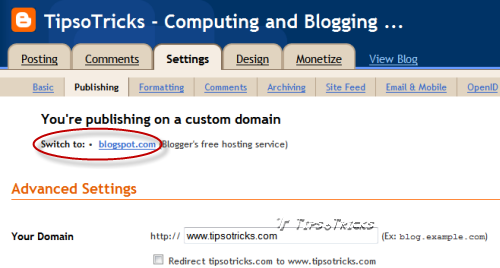
REMEMBER! You won’t be able to import anything in WP (Step #4) if it’s set to custom domain and this is why this step is very crucial.
4. Import Blog Posts into WordPress
Now Login to your WordPress admin panel, by accessing: http://www.mysite.com/wp-admin/
If you still can’t see the login page this means domain name is still not propagated so wait more until your domain finally points to your new webhost. (If you’re really too much excited about this then keep checking after every hour – you’re never informed when this happens :P)
If you can access to WP admin panel, then see the “Tools” tab in left menu and click “Import” under it. Select “Blogger” from the list.
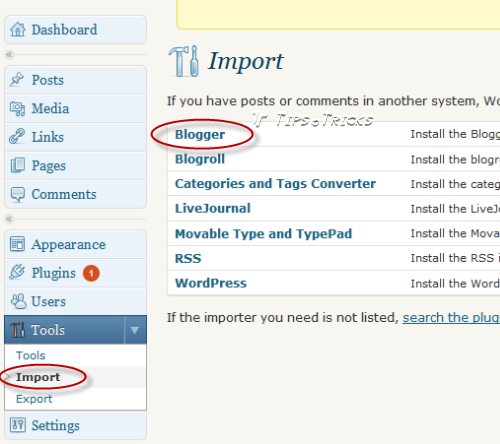
Install and Activate the plugin. You’ll be asked to grant access to your blogger account, Allow it to access your blog(s) at blogger account. Once the authorization is completed, you’ll be redirected back to WP where you’ll see all your blogger blogs listed (if you have more than one). Just click the Magic Import Button beside the blog you want to import in WP.

This may take several minutes (depending upon the number of posts and images). After the process is completed, you’ll be able to see all your posts and comments under respective section in WP admin panel.
If you were using any third party commenting system on blogger (other than blogger.com’s default comment form) than you’ll have to import the comments separately by using the Comment service’s plugin in WP.
5. Change Permalinks Settings in WordPress
This is the tricky part but MOST IMPORTANT step of all. That redirects all your traffic to your new WP blog, saving your SE status and rankings, incoming links and all the Google Juice associated with your blog.
Why changing permalinks? Because WP default permalink is very different than the blogger’s.
Blogger permalink – (http://mysite.com/year/month/my-name-is-zain.html)
WordPress permalink – (http://mysite.com/my-name-is-zain/)
Since Search engines have your blogger blog’s permalink indexed therefore if you don’t change permalink after the migration, search engine will never know that you’ve a changed permalink and users coming from search engines will be presented an error page on your blog. So to keep the visitors’ flow coming from Search Engines, we have to change the WP’s default permalink to look like blogger’s permalink.
To do this, go to “Settings” tab in WP admin panel, and choose “Permalinks” under it. Select “Custom Structure” and paste this in the box.
/%year%/%monthnum%/%postname%.html
…and save the settings.
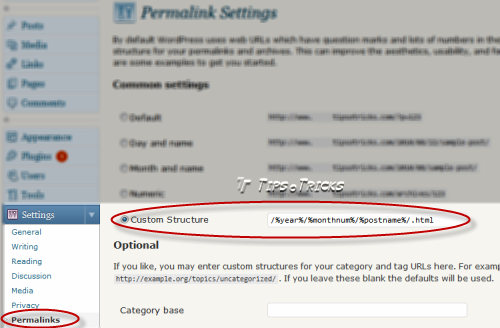
But the work isn’t done yet, this only changes the permalink structures. Visitors from Search Engines would still be seeing 404 error page. This is because the difference between the permalink is not removed completely. To do this there’s a plugin called “Maintain Blogger Permalinks” that you’ve to install. This plugin is used to convert permalinks of blogger to make them wordpress compatible (as Blogger truncates some words from post title that WP doesn’t).
1. Download Maintain Blogger Permalinks to your system.
2. Goto Plugins and select “Add new” plugin.
3. Choose “Upload” and browse the plugin from your system.
4. After auto installation, “Activate” the plugin.
5. You can now see “Maintain Blogger Permalinks” under Settings tab in WP.
6. Click it, you will see only one button that says “Maintain Blogger Permalink”
7. Click it and let the magic work automatically.
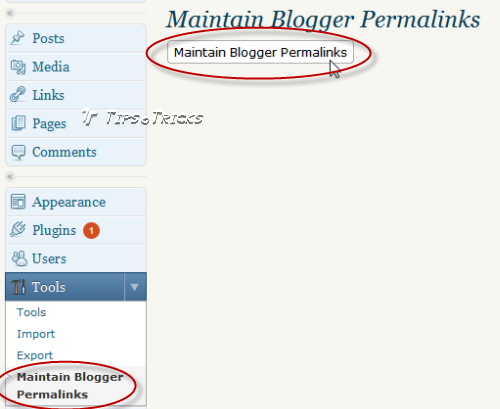
This is will take few seconds. After everything is done. Search any of your post on Google, and click the link from there, it should redirect to the post on your WP blog perfectly!
6. Switch Blogger Back to Custom Domain
This is probably the easiest step of all. This is to make sure that if any of your http://xxx.blogspot.com links is accessed it should go straight to your WP blog to the appropriate posts instead of showing an error on blogger blog.
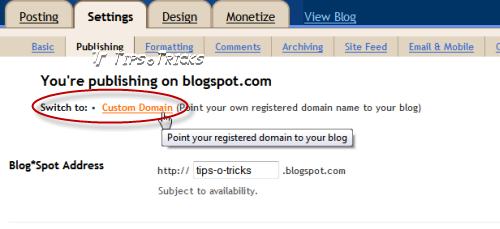
To do this, Go to your blogger blog and set the custom domain name again. Select settings > publishing and click custom domain. Enter your URL and save the settings.
And that’s it!
Time to enjoy your new WP blog with same PR, Search Engine Rankings, SEO Status, and Permalinks. 🙂
Some Tips to Remember:
1. After complete Migration NEVER ever delete your blogger blog, as your images are still hosted at blogger.com’s servers and what you see in your WP (imported) blog posts are the same images. There are many reasons not to delete your blogger blog but I think this would be enough to tell the importance. 😀
2. WP auto detects multi-authored blogs while importing. So if your blogger blog has multiple authors, then don’t forget to create the authors (right at the spot) at WP when it imports all your blog posts and asks to assign users to posts written by them. Refreshing or Leaving that page to create new users will destroy the import session and you’ll have to delete and re-import all posts again.
3. If you were using Third Party Comments System on Blogger then you won’t see any comment imported. You will have to install the plugin provided by that Comment System to import your comments.
4. If you’re new to WordPress than do not install plugins blindly after importing. A single incompatible plugin can crash the whole website. (This is where I had terrible experiences and lost days in setting up everything again)
5. All your Labels from your blogger blogs will be imported as “Tags” in WP. And all the posts will be given (default) “Uncategorized” category in WP. This is because in WP every post has to be put in a category before publishing. If no category is chosen and post is published then the default category is assigned. Since imported posts have no category assigned to them therefore “Uncategorized” (default one) is the assigned to all of them. To remove this, create a new category with any proper name, make it default and delete the “Uncategorized” to make things look pretty 😉
6. This is the important one. To do testing create a new folder in the root of your web hosting space, name it with anything you like, assign a subdomain to it and call it a test blog. And do all the testing and playing stuff with the plugins, themes, scripts, widgets or anything that you think might cause an error. This saves your original blog and its integrity. So even something bad happens and you lose your test blog, you will never feel ashamed in reinstalling it 😀
I hope I was clear at every single step above and everything is defined in its best manner. If you’re planning to move from Blogger to WordPress, then I hope this would become your ultimate guide.
If I missed something then don’t forget to add through comments. It’ll be highly appreciated. If you face a difficulty at any step, feel free to ask, I’ll try my best to resolve your issue. 🙂
Thanks
–Zain


