Reviews
EaseUS Data Recovery – The Only FREE Data Recovery Tool As Good As Paid Ones
Have you ever regretted deleting something from your system? I am sure many of you would have. Some of you would have got your pen drive corrupted, some of you would have got it mistakenly formatted or system breakdown or some viruses would have taken away some of your precious files.

Hard drives and especially flash drives are very prone to these attacks. Almost every one of us has encountered at least one of the above said tragedy with our data. But instead of just regretting, there are other options available to you. Just have a look at “Data Recovery Wizard”.
Best Free Data Recovery Tool
EaseUS Data Recovery Wizard is data recovery is one of the best free data recovery tools which is available on both Windows and Mac for FREE and on the premium basis as well which provide limitless recovery options. It is able to recover deleted, formatted, corrupted or any other lost files from a number of devices including Pen Drives, Hard Disk, CDs, DVDS, etc. It provides easy recovery options so that even a common user can utilize it. It is safe and secure, means it will never hurt any of your devices whether fixed or peripheral. It is just like Recycle Bin of Recycle Bins. With a number of features available, Data Recovery Wizard 9.9 is one of the best and easy to use data recovering tool.
I am going to show you how to recover deleted files from Pen Drive using Data Recovery Wizard. Follow the step by step guide for easy recovery of your files:
Step 1 – Connect the Drive
Connect the Drive from which you want to recover your deleted files to your system. Try to connect it to the fastest port available so that your files are recovered quickly.
Step 2 – Launch Application and Select Relative Options
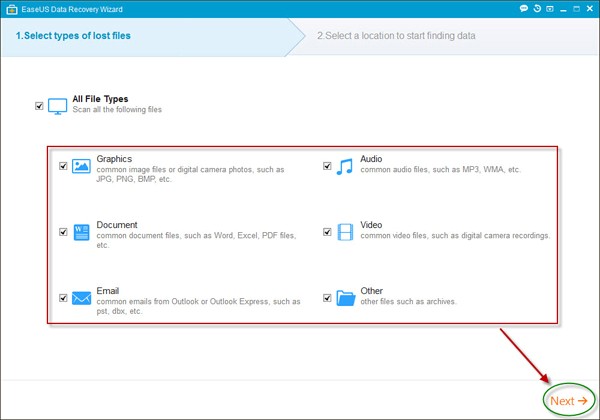
Launch Data Recovery Wizard. After launching you will be shown a window in which you to select the type or types of files you want to recover. Six options will be provided which are Graphic, Document, Email, Audio, Video, and Other.
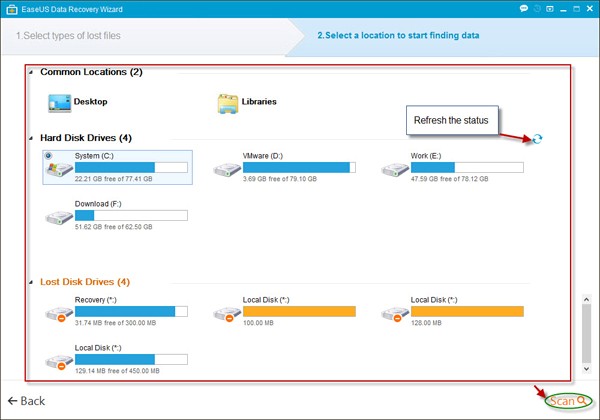
After that, you will have to specify the place from where you want to recover files. Select Pen drive from the window and you are done with settings.
Step 3 – Scan your Drive
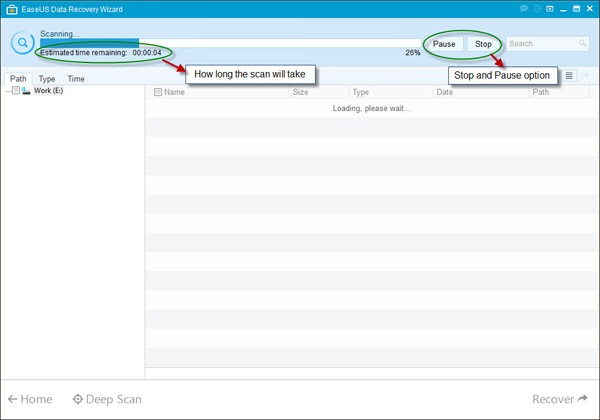
After selecting the options above, click on scan to start scanning. A window will appear which will you the status of scanning. A bar will show the progress of scanning. A couple of buttons will be available at the right of the progress bar, one for pausing and other for stopping. Below the progress bar you will see the estimated time left for the scanning to complete and progress percentage. Below them, you will find the files recovered from the Drive.
Let the scanning be complete and all of your deleted or corrupted files will be recovered. A pop-up window will appear asking for the Deep Scan in case the files you were looking for are not recovered or recovered but not opening correctly.
Step 4 – Save Recovered Files on your Hard Drive
When you are sure that all of your files are recovered, save them on any local disk of your Hard Drive.
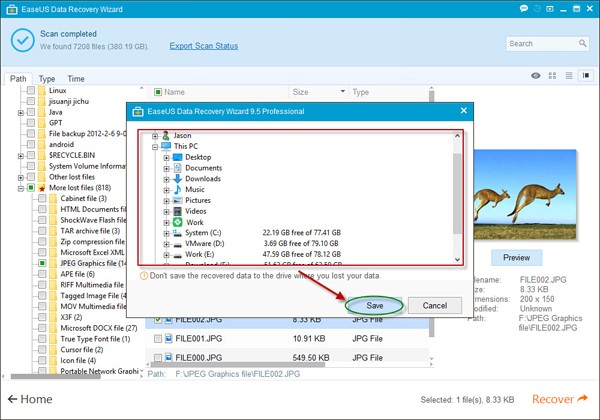
Once your recovered files are copied on your disk, then you have successfully recovered deleted files from your Drive.


