Development
Add JavaScript Collapsible (show/hide text) Panel in Blogger Blog.
Although I’ve been using this collapsible panel widget for a long time now but never shared how to use or install it in your blogger blog. Recently it’s installation method is requested from one of my readers via email.
JavaScript Collapsible Panel is one of the most useful widgets that I personally like. It saves a lot of space specially in lengthy posts. You can hide text under headings or hide HTML code inside show/hide panel.
It simply uses a JavaScript function to hide/show piece of text. You can use it in your blog posts, in a widget or any where in your blogger template.
First let me show you how it looks like.
Click any heading below.
1.
Title One
This is the example text for title one.
uisque blandit sagittis fermentum. Quisque arcu nibh, gravida eget rhoncus eget, commodo ornare elit. Integer hendrerit nunc ac mauris aliquam vitae commodo lacus
2.
Title Two
This is the example text for title two.
3.
Title Three
This is the example text for title three.
rus quis sapien tincidunt ornare in et risus. Donec in ultrices augue. Class aptent taciti sociosqu ad litora torquent per conubia nostra, per inceptos himenaeos. Nunc cursus vulputate erat, quis imperdiet urna imperdiet at. Donec urna..fermentum, erat arcu porttitor massa, et commodo diam sem id sapien. In hac habitasse platea dictumst. Nam luctus egestas nisl, pellentesque posuere lectus ultricies sed. Duis sapien orci, pharetra sed adipiscing id, pulvinar vel neque. Morbi convallis eg.
Installation Instructions
1. Go to your Blog’s Layout >Edit HTML
2. Find ]]></b:skin>
and ABOVE it, copy the following two lines of code.
.posthidden {display:none}

.postshown {display:inline}
3. Now find </head>
and just ABOVE it, copy the following piece of code.
<!-- Expand Collapse Post-->
<script type='text/Javascript'>
function expandcollapse (postid) {
whichpost = document.getElementById(postid);
if (whichpost.className=="postshown") {
whichpost.className="posthidden";
}
else {
whichpost.className="postshown";
}
}
</script>
<!-- Expand Collapse Post ends-->
4. That’s it. Save your template.
Using the Hide/Show Collapsible Panel
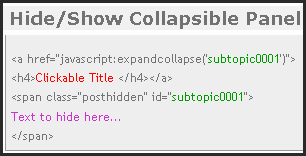
Now wherever you wish to put a expand/collapse panel. Put the following piece of code.
<a href="javascript:expandcollapse('subtopic0001')">

<h4>Clickable Title </h4></a>

<span class="posthidden" id="subtopic0001">

Text to hide here...

</span>
And just change the “Clickable Title” and “Text to hide here…” with your custom heading and text.
If you’re putting the code in a post and there are more than one collapsible panels in that same post, then don’t forget to change the ID’s (in green).
Like if you put second collapsible panel in the same post, change the ID by simply increasing one number to it, say, “subtopic0002“, “subtopic0003” and so on.
It’s not necessary that you assign numbers in ascending order – it is just for your convenience.
See some of my posts with this Collapsible Panel, here, here, and here.


